
Editorial note: This article was originally published on My Inner Creative and has been updated and republished in May 2026 under The Vessel’s editorial standards.
A wedding bullet journal is mostly two things sitting alongside each other: a long checklist, organised by how many months are left, and a budget page that records what has been spent against what was planned. Around those two pages everything else accumulates — the guest list, the dress and ring details, the song list, the day-of timeline, the post-wedding admin. The notebook does not change what a wedding is. It changes how the details of a wedding sit on the page, and how easy it is to find any one of them in the week it is needed.
Featured wedding planning spreads
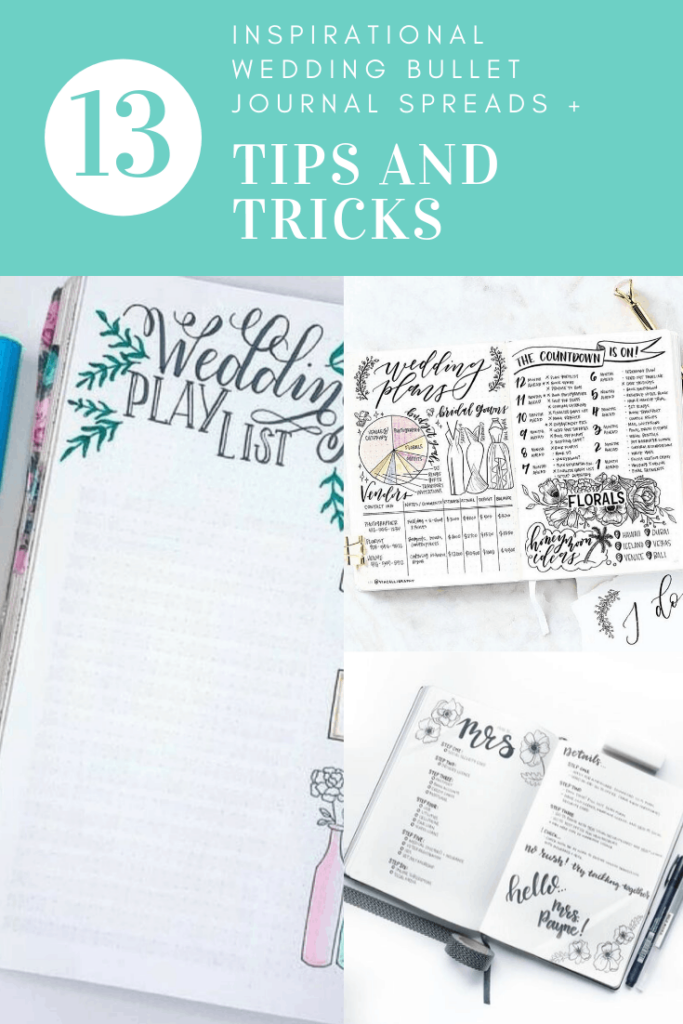
The spreads below come from the My Inner Creative community. They have been selected because, between them, they cover the full range of pages a wedding bullet journal typically needs: the master timeline, the monthly checklists, the budget tracker, the day-of itinerary, the guest list, the vendor contacts page, the dress and ring details, the song list, the countdown tracker, and the post-wedding admin pages described in the sections above.
They are not all organised the same way, and that variation is intentional. Some journalers dedicate a full notebook to the wedding; others keep a handful of spreads inside an existing journal. Some use a dense grid; others leave generous white space. Some are heavily decorated; others are built almost entirely from tables and lists. What they share is that each page has a clear job — it holds a specific set of information in a form that makes that information easy to find and update over the months of planning.
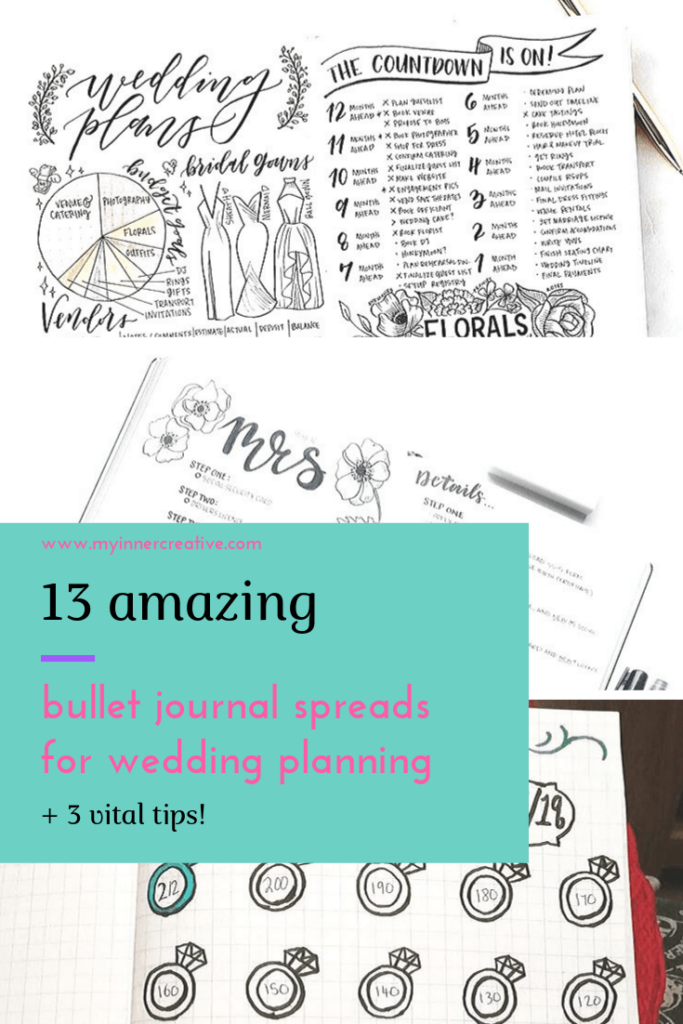
The spreads are included here as a visual reference. Any of them can be redrawn in a notebook with a pen and a ruler, and none of them require specialist supplies. The layouts that appear most often across the collection — the four-column budget, the month-by-month checklist, the day-of timeline — are described in the sections above, so the written descriptions and the visual examples can be read alongside each other.
The timeline is the spine of the notebook
Most wedding bullet journals are organised by the calendar. A common layout opens with a master timeline at the front, sometimes drawn as a vertical line down the page with the months marked on it, and a small set of tasks placed alongside each month. The task list is usually colour-coded so that everything for a given period of the planning shares a single colour. The result is a single page that can be looked at on any given week to see what should already be done, what is in flight, and what is still well ahead.
The timeline page is generally drawn early and updated rarely. The detail of any one month sits on a separate spread further into the notebook. The timeline’s job is to keep the larger shape of the planning visible without forcing the reader to flip through every spread; the individual months can hold the things that need to be ticked off in that month without crowding the master page.


The budget page
The budget is the page that does the most work over the course of the planning. A simple layout that appears across the gallery uses four columns: the category (venue, catering, photography, beauty, music, attire, stationery, flowers, and so on), the estimated cost, the actual cost once it is settled, and a small plus-or-minus column showing the difference. The plus-or-minus column is what makes the page useful in practice. It lets the journaler see at a glance which categories have come in under the original budget and which have run over, and to redistribute the remaining amounts accordingly.
A wedding budget is rarely accurate on the first draft. Most journalers below revise the page repeatedly as quotes come in and as decisions about scale are made. The page accommodates the revision better than a spreadsheet does for the same reason a paper notebook accommodates any thinking-in-progress better than a digital file — the old numbers stay visible alongside the new ones, and the path the budget took to its final state is itself a piece of useful context later.

The checklist
Beyond the timeline and the budget, the central planning page is usually a checklist that breaks the months between now and the wedding into discrete blocks. The blocks themselves match the cadence most planning sources use — well over a year out, twelve to nine months out, nine to six months out, six to three months, three months, one month, the final two weeks, and the week of. Each block holds the small set of items that conventionally happen in that period, with check boxes alongside.
The checklist works because it removes most of the cognitive load of remembering what needs to be done next. The journaler does not need to hold the whole plan in mind on any given week; the page does. A finished item gets a tick; an item that has moved gets an arrow; an item that has been dropped gets a line through it. The chronological structure of the page makes it easy to see at a glance whether the planning is on pace, behind, or comfortably ahead.

The closer-to-the-day pages
The pages dedicated to the final month and the day itself tend to be more detailed than the earlier ones. The final-month page usually holds the items that will fall through the cracks if they are not written down — the marriage licence paperwork, the final dress or suit fittings, the gifts for the wedding party and parents, the seating chart, the final headcount to send to the caterer, the playlist for the reception. The day-of page is more often a timeline than a checklist, marking the order of events from the early morning through to the end of the evening, with a column alongside for who is responsible for each piece.
An equally common page that often gets forgotten is the one for the weeks after the wedding. Name changes if either partner is changing names, thank-you cards to send, photographer hand-off, dress preservation or sale, return of any rented items, finalising of any payments that were deferred. These tasks do not feel urgent on the day, but they accumulate quickly and the post-wedding page is the simplest way to keep them from getting lost in the slowing-down that follows the wedding itself.
Pacing and rest pages
Several of the spreads below include a page or a margin dedicated to pacing — a small set of notes about which days of the week are not for wedding planning, and a list of things the journaler is planning to do on those days that have nothing to do with the wedding. A long planning window can quietly turn into a year of weekends spent on the same set of tasks, and the rest pages are a small piece of structure that pushes back against that.
The pages are not prescriptive. They are usually a short list — a long walk, a film, a meal somewhere that has nothing to do with the wedding, a few hours with a book — and the point is less the specific activity than the fact that the day is marked, on the page, as not belonging to the planning. A rest page is one of the smaller pieces of structure in a wedding bullet journal, but it is often what keeps the final months feeling like a part of life rather than a project to be finished.


What to take from the gallery into your own notebook
A few things are worth noting after looking through the collection as a whole. First, no spread in the gallery is a template to be copied exactly. Each one was drawn by someone planning a specific wedding with a specific set of constraints — a particular guest count, a particular budget, a particular number of vendors to track. The value of looking at them is not to reproduce any one layout but to see the range of decisions that have been made and to identify which of them fit the shape of your own planning.
Second, the spreads that tend to be most useful over the course of the planning are rarely the most decorative ones. The budget pages and the checklists in the gallery are the pages that accumulate the most marks over time — crossed-out estimates, revised totals, ticked items, arrows moving tasks forward. A spread that leaves room for that kind of revision, with wider columns and more space between rows, will serve better in month eight than one that looked beautiful in month one and has no room to breathe.
Third, if you are starting a wedding bullet journal now, the most efficient approach is to draw only the pages you need in the next four to six weeks and leave the rest of the notebook blank. The pages for the month before the wedding and the day-of timeline can be drawn much closer to the time, when the actual sequence of events is known. Drawing them too early means drawing them twice. The gallery shows the finished forms of these pages; the working version will go through several drafts before it reaches that state.
A wedding bullet journal is finished long before the wedding is. The pages stop being filled in around the time the planning stops being decisions, and the notebook becomes a record rather than a working document. The day itself is short, and the work the notebook did mostly happened in the months before it, in small entries against a budget page and ticks against a checklist. What the journaler is left holding afterwards is a notebook that holds the planning, not the day. The day is held by the people who were there.